WebFPC HELP
Using WebFPC
WebFPC allows the user to view the contents of a contig.
The Contig Selection Screen
The Contig Selection Screen is divided into two sections: Select Contig on the left side and Search for Contig on the right. Both can be used to locate a contig for viewing.
Select Contig AreaThe Select Contig section, seen in Figure 1 on the right, contains a list of contigs by their number with other useful information in the other columns. You can select a contig by double clicking on the row or by clicking on the row and clicking on the "Display" button underneath the list. Going over the column headings from left to right, they are "Contig", the contig's number. The three in the middle are "Clones", "Markers", and "Sequenced"; the number of clones, markers, and sequenced clones, respectively, in each contig. The number of sequenced clones are those with a FINISHED status. Next is the Q number, which is the number of clones that FPC failed to place properly; it provides a good measure of the quality of the contig. Any contig with a Q number under 6 or so is a good contig. However, users should use their own judgment. A '-' character indicates that the Q number not known; it is not the same as a 0. Last is the "Chr" column, which contains the chromosome number if the contig has been located on a chromosome. |
Figure 1: Selection Area |
Back to top
Search for ContigThe Search for Contig, seen in Figure 2, allows the user to search for a contig by the name of a marker or clone contained within the contig. To search, enter the clone/marker name in the text area next to the "Search by Marker" or the "Search by Clone" button, as appropriate, and then press enter or the Search button. The results will appear in the list box below. You can then display a contig by double clicking on the row containing the contig number. Wild characters: To search for all markers with a given prefix, enter the prefix followed by a '*'. For example, the string 'R*' entered into the Marker box will list all markers starting with a 'R'. Figure 2 shows that entering the '*' lists all markers. If a name is entered without any preceding or trailing '*', yet the marker cannot be found, a '*' will be put on the beginning and end of the name and a new search will be done. These same rules apply to clone names. The text in-between the buttons and the results list is used to report the status of searches. Messages appear at the top, and move down when others appear. When a search is running, the search button will turn into a stop button, which should be pressed to stop the search. Also, the search will be automatically stopped when you select a contig. The "Clear" button, located under the results list, clears the results list. Otherwise, the results of each consecutive search will be appended on the end of the list. |
Figure 2: Search Area |
The Contig Display Screen
The Contig Display Screen displays the contents of a contig. Most of the screen in taken up by the display area, with the control section along the top.
Display Control Area
The Control Area is used to adjust the Main Display Area, and show some basic information regarding the contig.
|
Basic Information
On the right, in Figure 3, is an informational display that shows the version of WebFPC and the number of the current contig. If the contig has been assigned to a chromosome (or linkage group), that is also shown. |
Figure 3: Information Area |
|
Arrangement Controls
The top row of the Control Panel, see Figure 4 on the right, contains a variety of controls to manipulate the display, as described below. |
Figure 4: Controls, Top Row |


Back Button: Returns the user to the Contig Selection Screen.
Clone Rows: To change the number of clone rows, simply change the number in the text area next to the "Clone Rows" and press enter. If the number entered is greater then the number of clones visible, the new number of rows will be reduced to the number of visible clones.
Show Clones: The concept of "burying" a clone requires a little explanation. If FPC determines that two clones have similar fingerprints, one is buried within the other. The buried clone is referred to as a Buried or Child clone, while the clone into which it is buried is described as a Canonical or Parent clone. The type of burying reflects the degree to which the fingerprints agree, exact being the strongest, followed by approximate and then pseudo (see Table 3 also). The control has three settings;
- No Buried: all buried clones are hidden, leaving only the canonical and normal clones.
- All: all clones are displayed; canonical, buried, and normal.
- Seq Only: only the sequenced clones are shown.
Remarks Choice
Figure 6: Remarks
Clone Remarks 1 - click on it to hide the clone (primary) remarks
Marker Remarks - click on it to hide the marker remarks
Clone Remarks 2 - click on it to hide the clone (secondary) remarks
Zoom Controls
Figure 7: Controls, Bottom Row

On the bottom row are the zoom controls. The text area next to the 'Adjust Zoom by' label contains the scale by which the zoom will be changed. It can be changed by clicking on it and then typing the new scale, pressing enter has no effect. The scale can be any positive decimal number or scientific notation that is greater then 1. For example; "2", "1.001", and "3.1415e3" are all valid values. To the right of that is the buttons that zoom the view in and out.
Getting Additional Information (linking to other sites) Figure 8: Other Sites
Figure 8 shows the control for looking up additional information
on the web. The Chooser box shown in Figure 8 is set by default to
"No highlight". Pull-down on the box and it will show the web sites
that this FPC project can link to. Select a web site, and all clones and markers
that have information at that site will turn light-red. Select a light-red clone
or marker and then click the "Link to Site" button to view the record at the
corresponding site.
If you are interested in having WebFPC provide such a connection to your database, please contact us.
Back to topMain Display Area
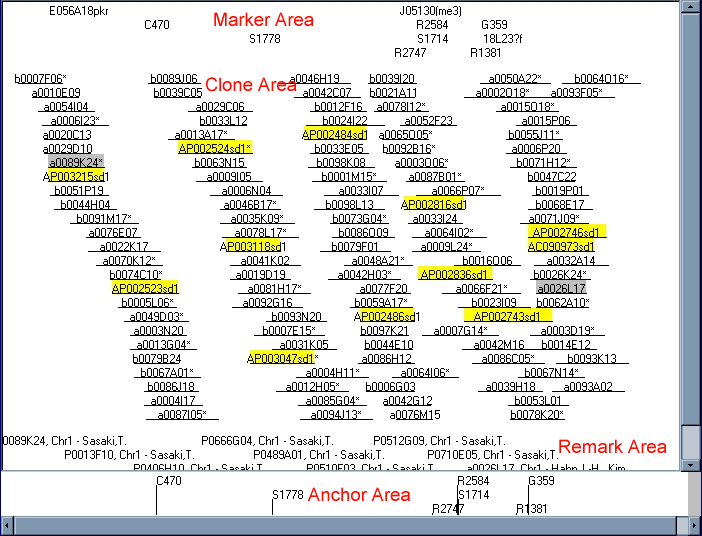
The Main Display Area is divided into four sections: from top to bottom they are the marker, clone, remark, and anchor areas. If the Main Display Area is too large, the marker, clone, and remark areas are placed in a scrollable window panel. The anchor area is placed in a separate scrollable window panel. The horizontal scrollbar for the three upper areas is below the Anchor Display Area. Figure 9 shows the main display area; the four sections are labeled in red.
Figure 9: Main Display Area
|
Clone Types
Clones that are in the process of being sequenced, or have been sequenced are highlighted when not selected. Table 2 list the different types and their colors (these are the defaults, and may be changed at installation). Figure 11 shows examples of all three. Table 2: Shotgun Clone Colors
|
Figure 11: Shotgun Clones |
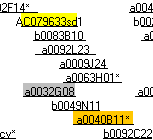
Buried and Canonical clones are marked with a special character after their names. See Table 3 below for a list of the characters and their meaning. In Figure 11, above, clones a0063H01 and a0040B11 are both examples of "Canonical, All Types of Children" clones and are marked as such with a '*'.
Table 3: Clone Type Indicator Characters
| Clone Type | Character |
|---|---|
| Buried, Exact | = |
| Buried, Approximate | ~ |
| Buried, Pseudo | # |
| Canonical, Pseudo Children Only | + |
| Canonical, Exact and Approx | * |
The Anchor Area contains any genetic anchors in the contig. Clicking on an anchor moves the view to that region of the display.
Back to top
The users can filter and color the markers that they want to get displayed in the
Main Display Area using these settings. Figure 12 shows the default filter settings. Each row in the table is a rule
which specifies what markers are going to be displayed and in what color. A rule is a 4-tuple
Marker Filter
Figure 12: Marker Filter: Default
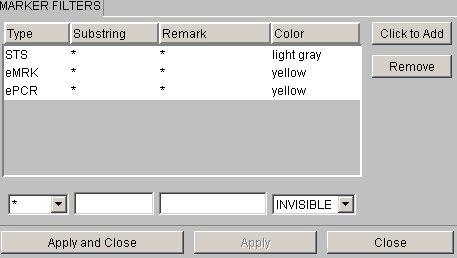
To add a rule, click 'Click to Add' and a row gets added to the table. Use the Input boxes to make a rule. And then click 'Apply'. All the rules in the table are applied together; that is, a logical OR is taken of all the rules, with priority given to a rule which is lower down in the table. For each row, a logical AND is used to combine the entries in the row's columns.
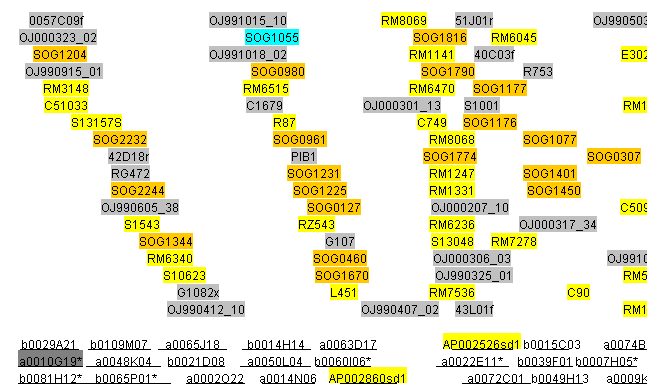
Example: The rule highlighted in black in Figure 13 would color all the markers of type 'eMRK' which have 'SOG' as a substring in their name with the color 'Orange' as shown in Figure 14. The default 3 rules also apply but the last rule takes precedence. Hence the markers that do not satisfy this rule are colored using default rules, and those which do satisfy it are colored with 'Orange'.
Figure 13: Marker Filter: Add a Rule

On Applying, the markers are displayed in the Main Display Area as shown in Figure 14.
Figure 14: Main Display Area: Result